Learn How to Create Custom Silicone Purge Dams of Any Size, Personalized with Your Own Branding
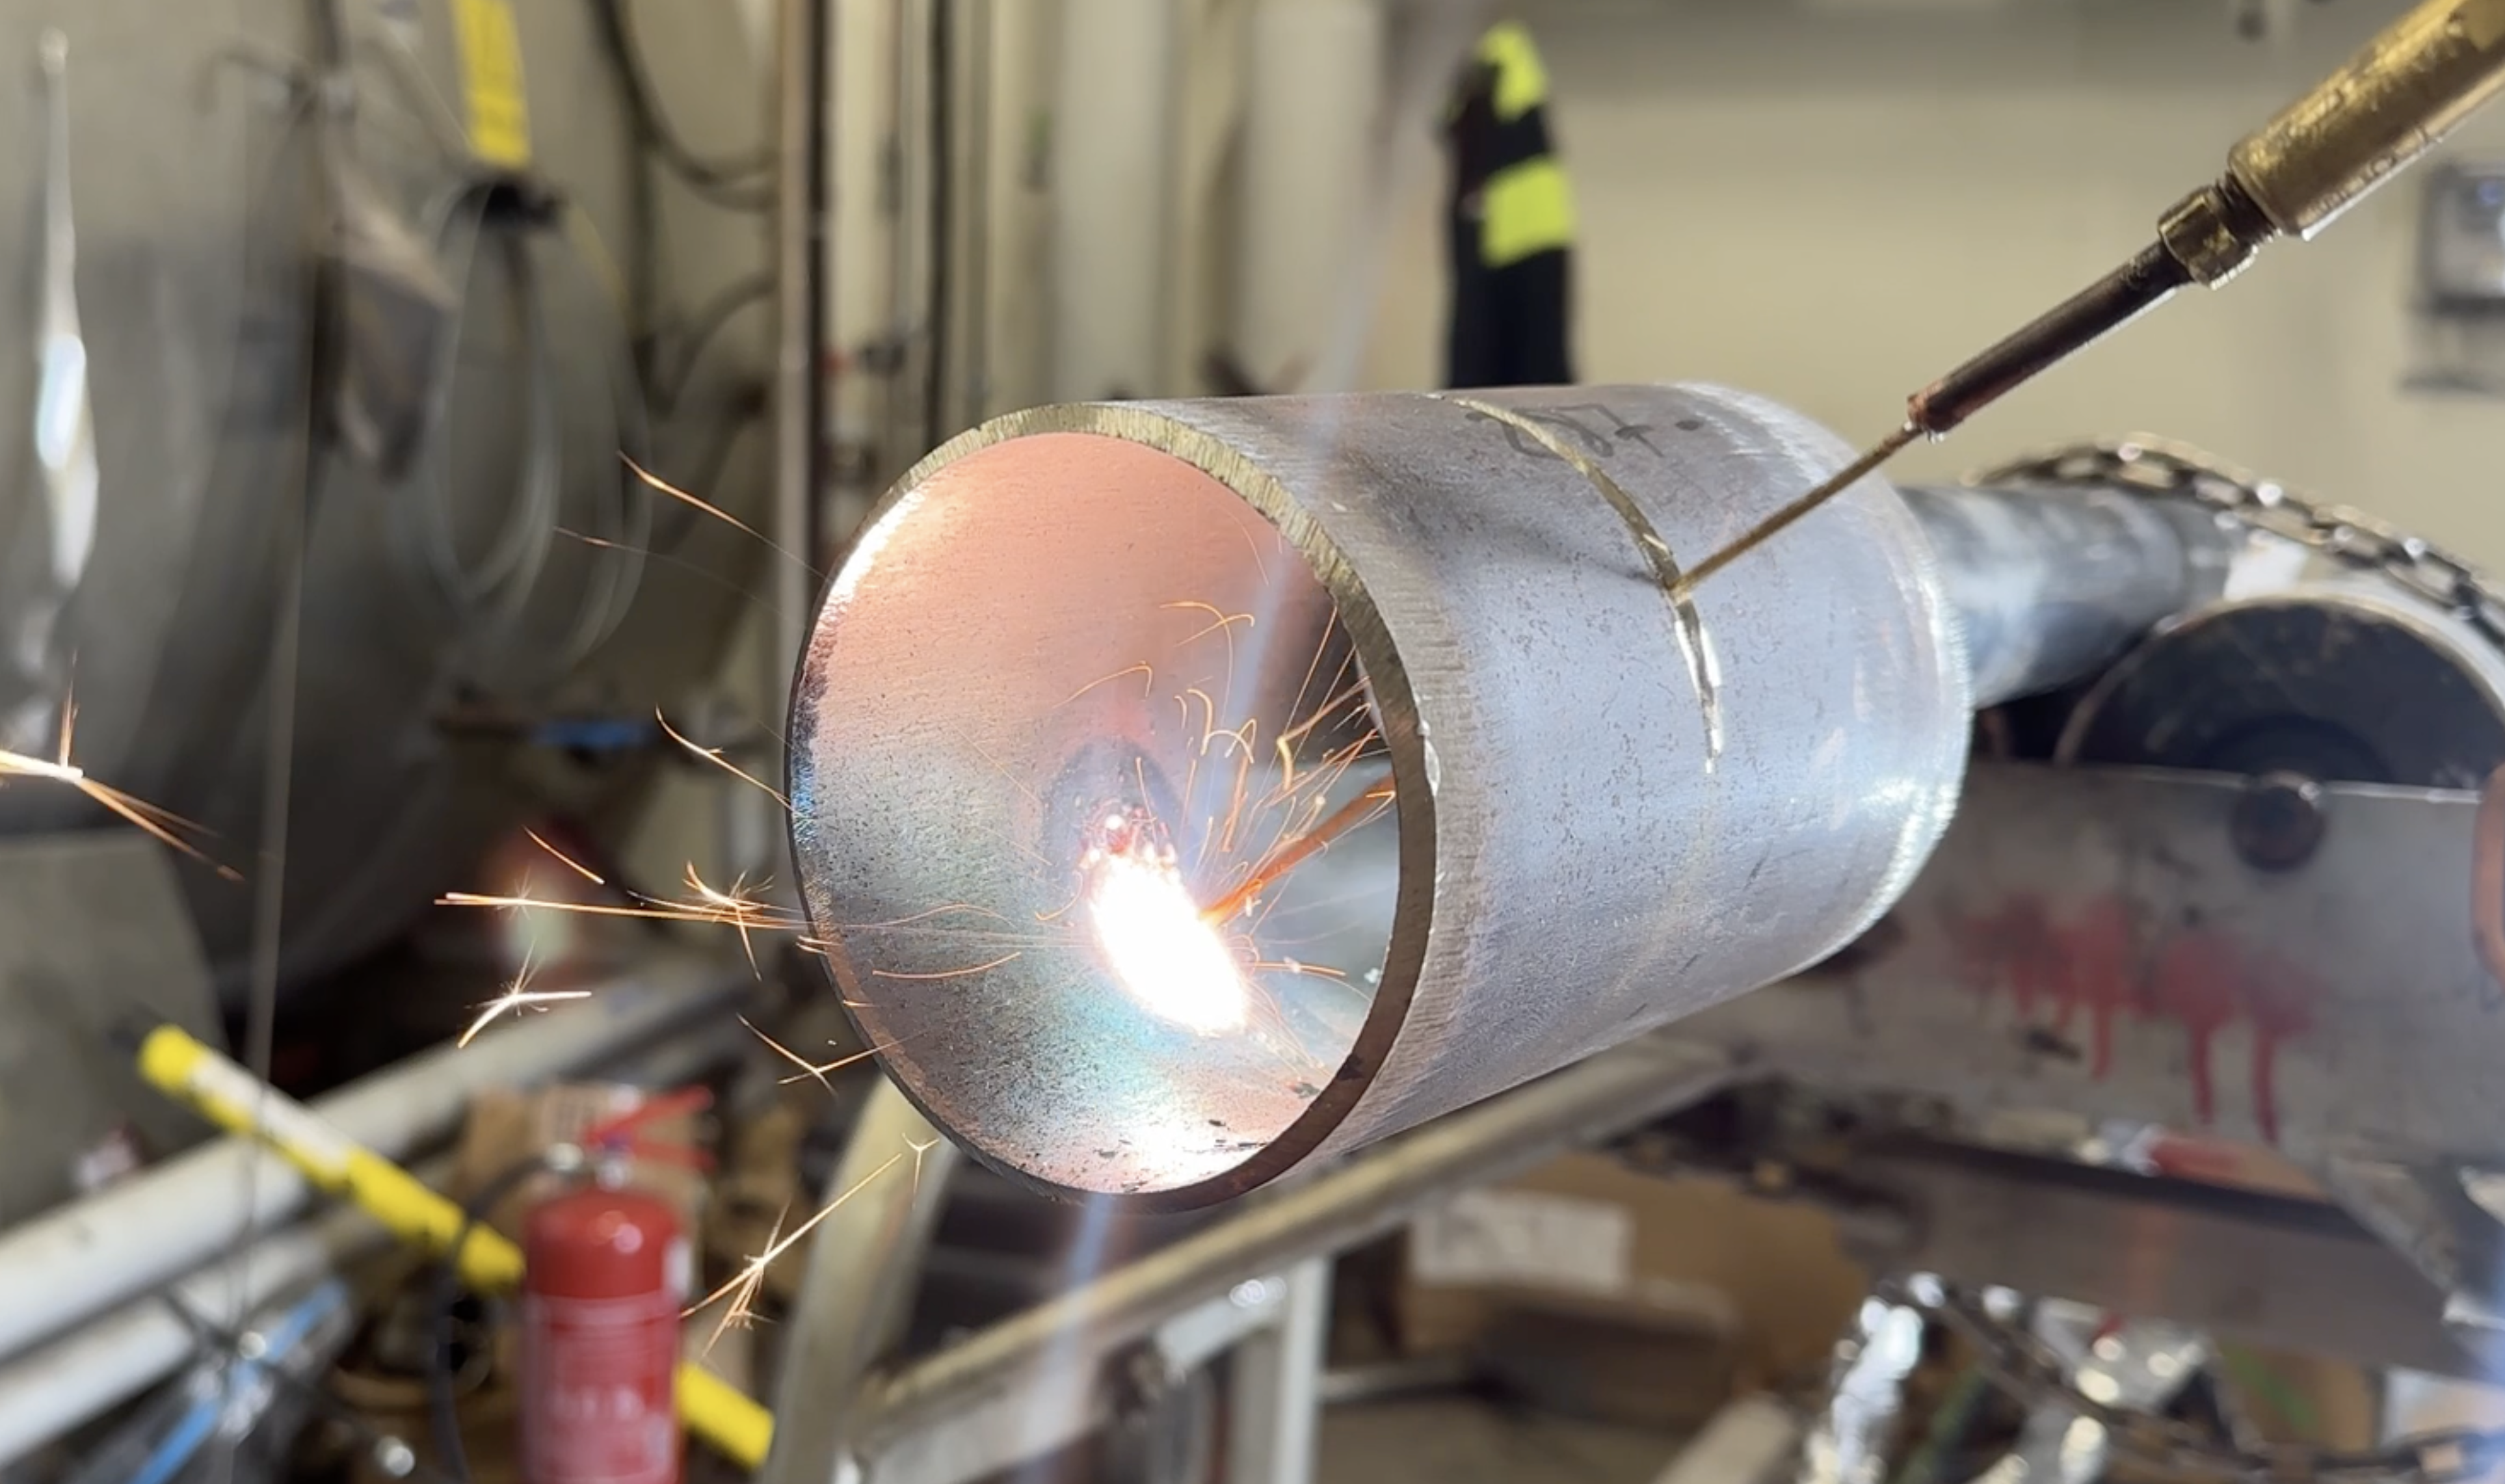
Hello, fellow welders! I’ve been waiting for the right moment to introduce a high-quality two-component silicone that allows us to create professional TIG purge dams on our own. The time has finally come, and as usual in our welding adventures, we’ve hit a jackpot—like that time with the NDT inspector who approved an entire project without ever setting foot on-site!

This silicone offers a triple advantage that makes it a game-changer:
Key Benefits of Platinum-Cured Silicone:
- Heat Resistance
It withstands up to 300°C (572°F) during short-term contact. A dream come true for industrial welders! - Food-Grade Quality
This means it’s also suitable for pharmaceutical applications—another win for industrial welders! - Fast Curing
The silicone fully cures in just 24 hours, making it incredibly practical for daily use. - Cost Efficiency
Creating a DN80 purge dam costs only €1.50 in materials, plus two hours of your time. In that time, you can produce five purge dams—saving money while gaining efficiency. - Custom Branding
Your TIG purge dams can carry your personal brand, adding a professional touch. - Easy-to-Use 3D Mold
Download a pre-designed mold file, scale it to your desired size, and you’re good to go. Consider it a gift from pipeweld.ee just for you.
Tig Purge tool DYI
My Experience in purge tools making & Tips for Success
I’ve personally tested the entire process and am happy to share everything I know. All I ask is that you repost this article in relevant welding forums and explore the other cool DIY tools we’ve developed here on our blog.
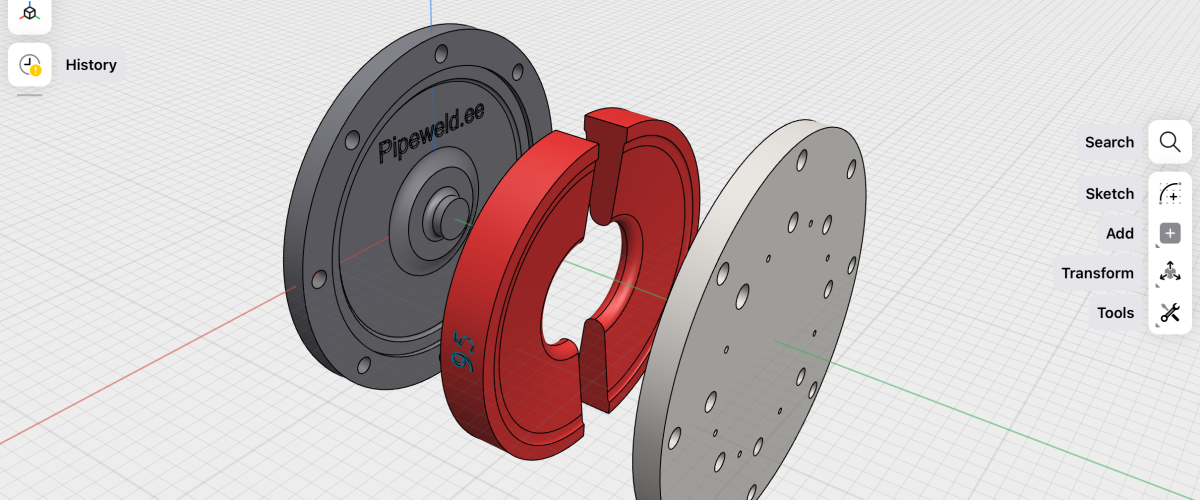
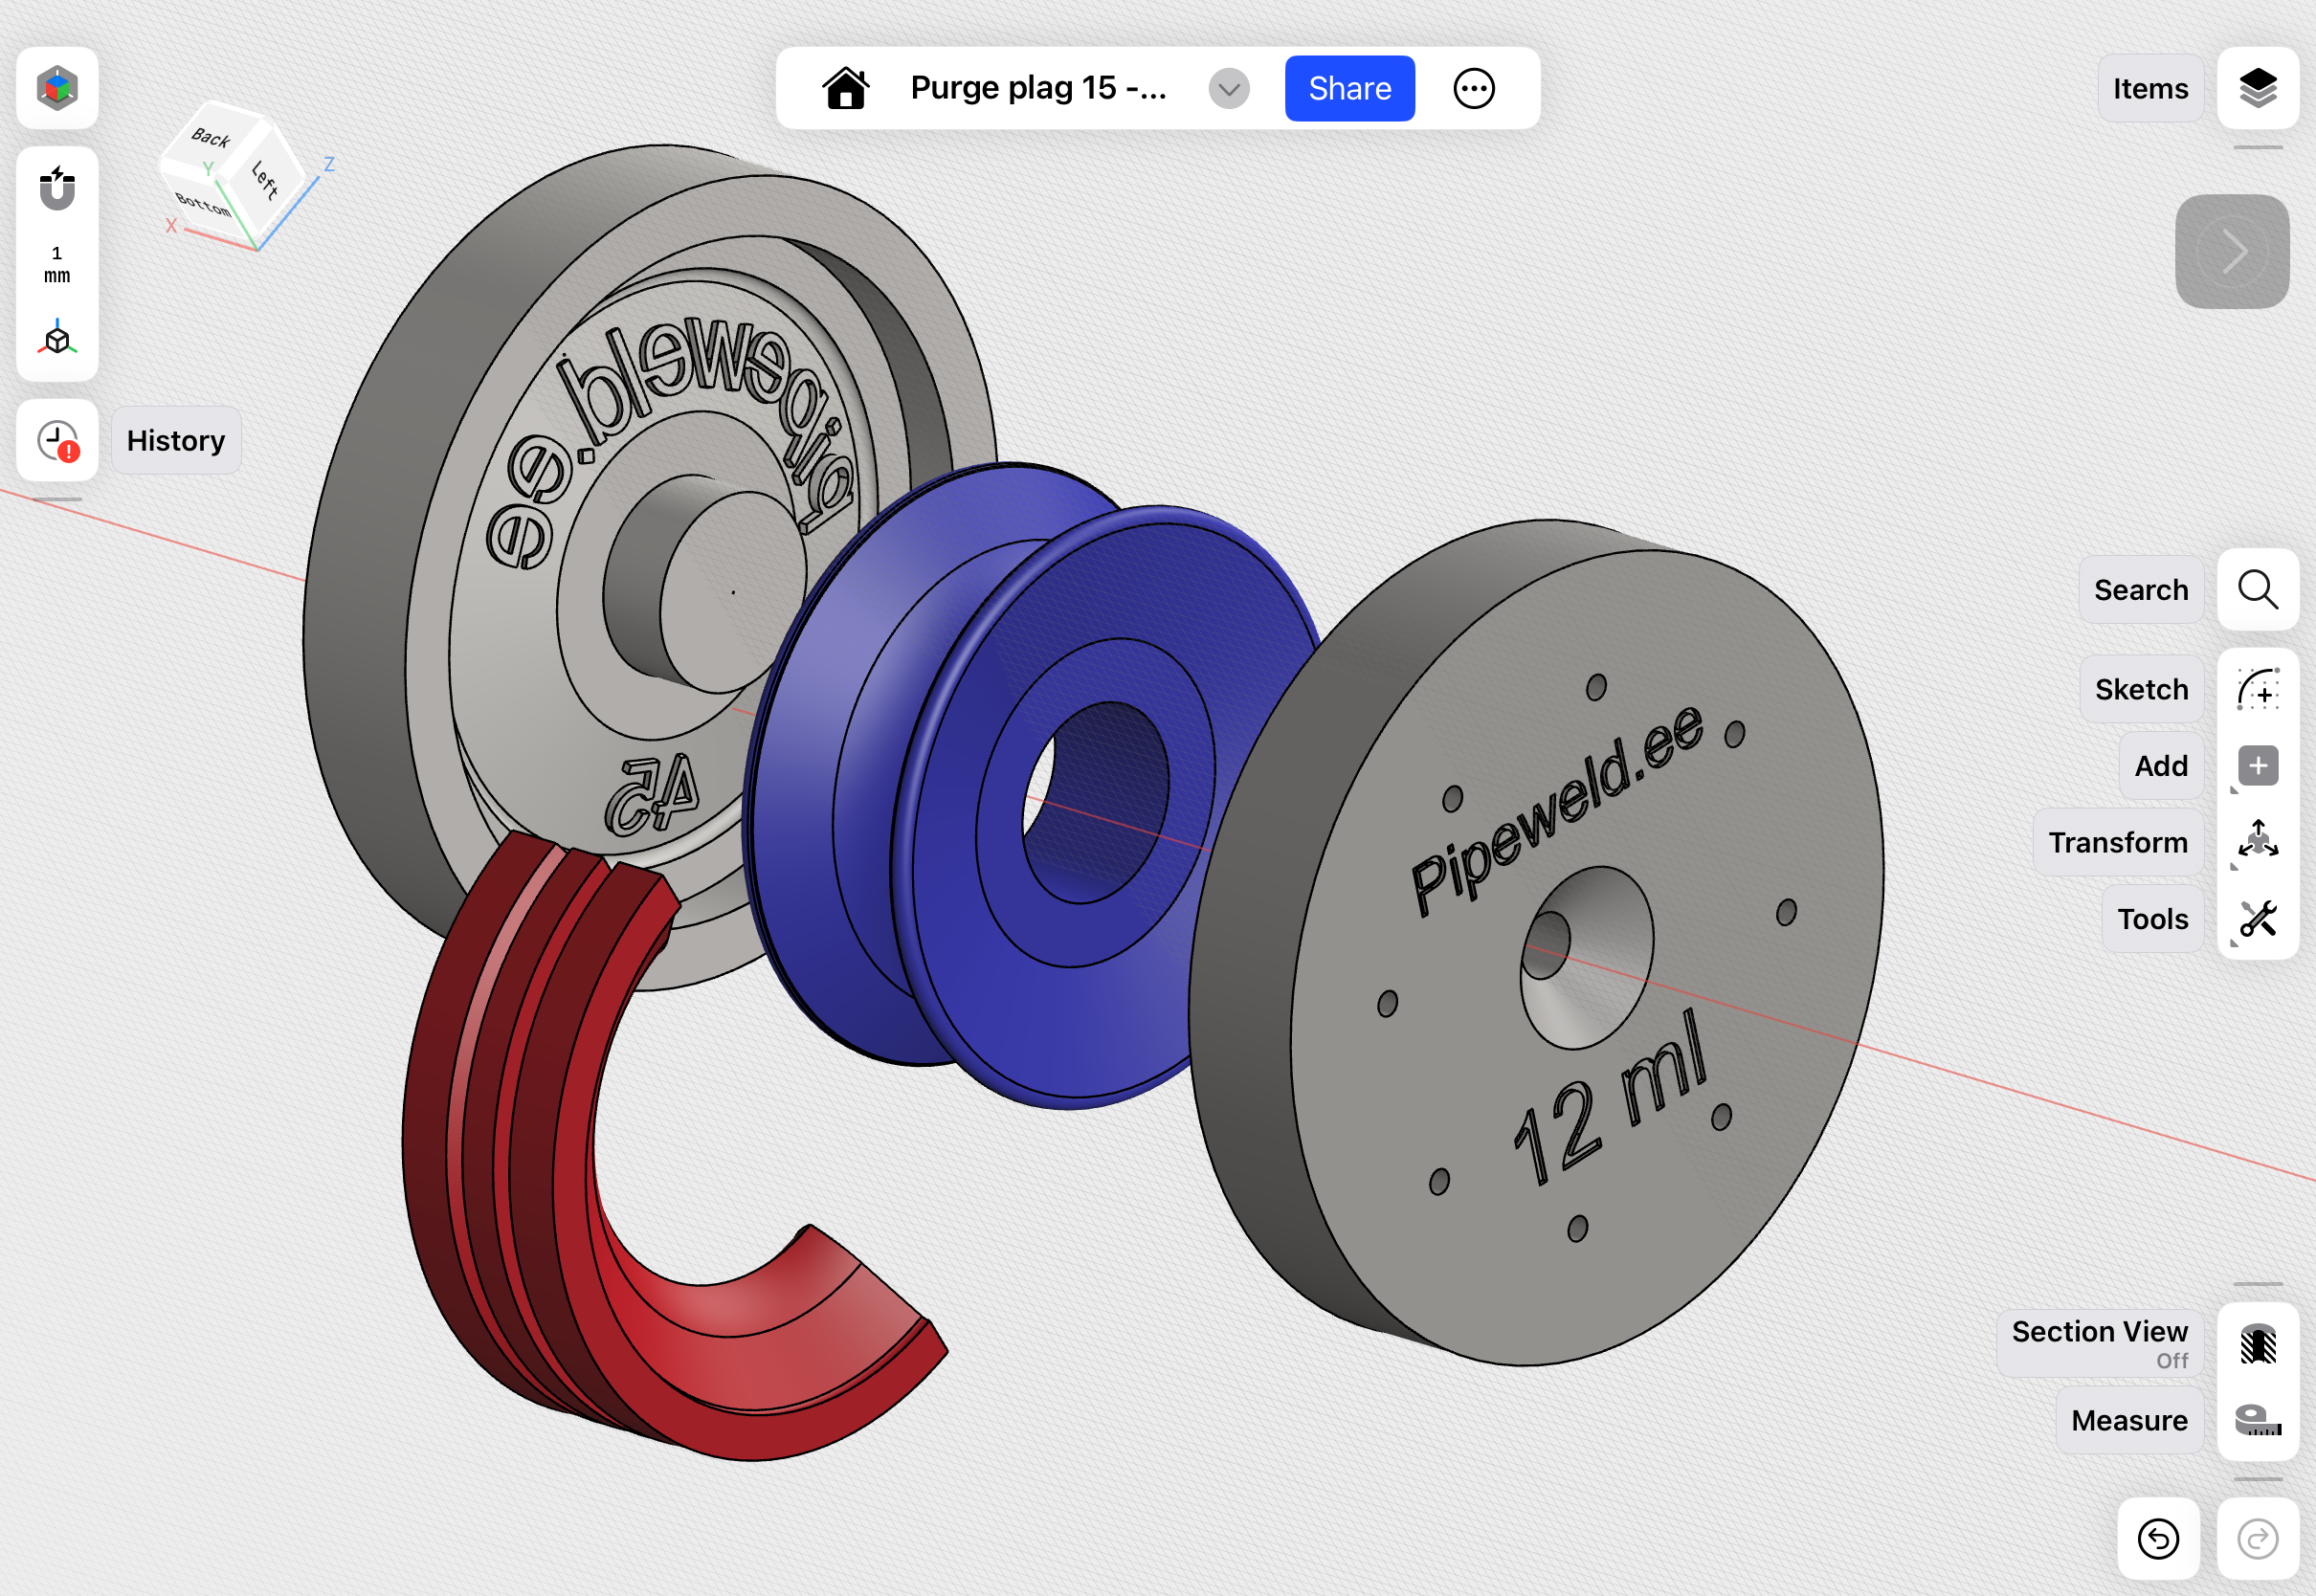
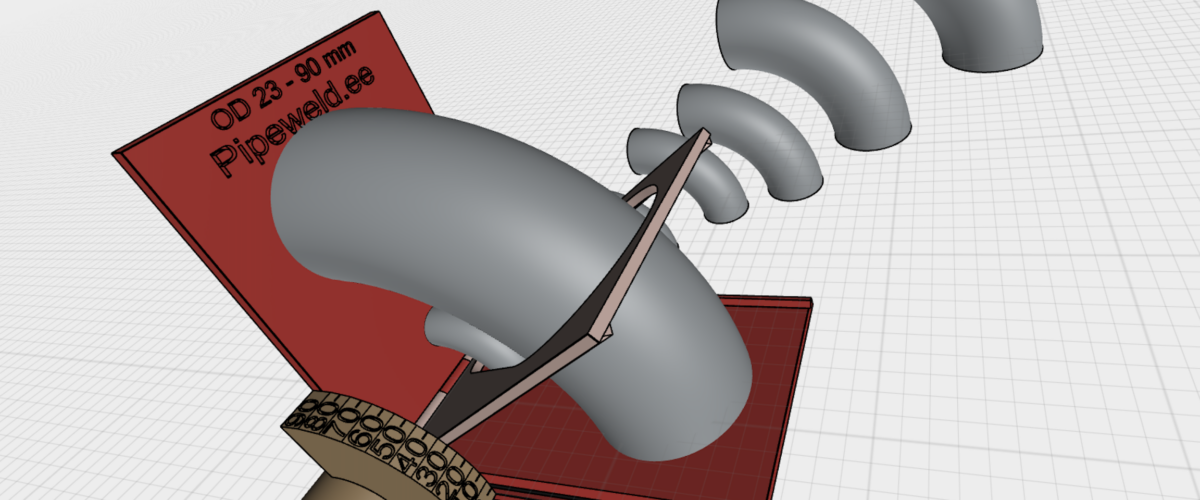
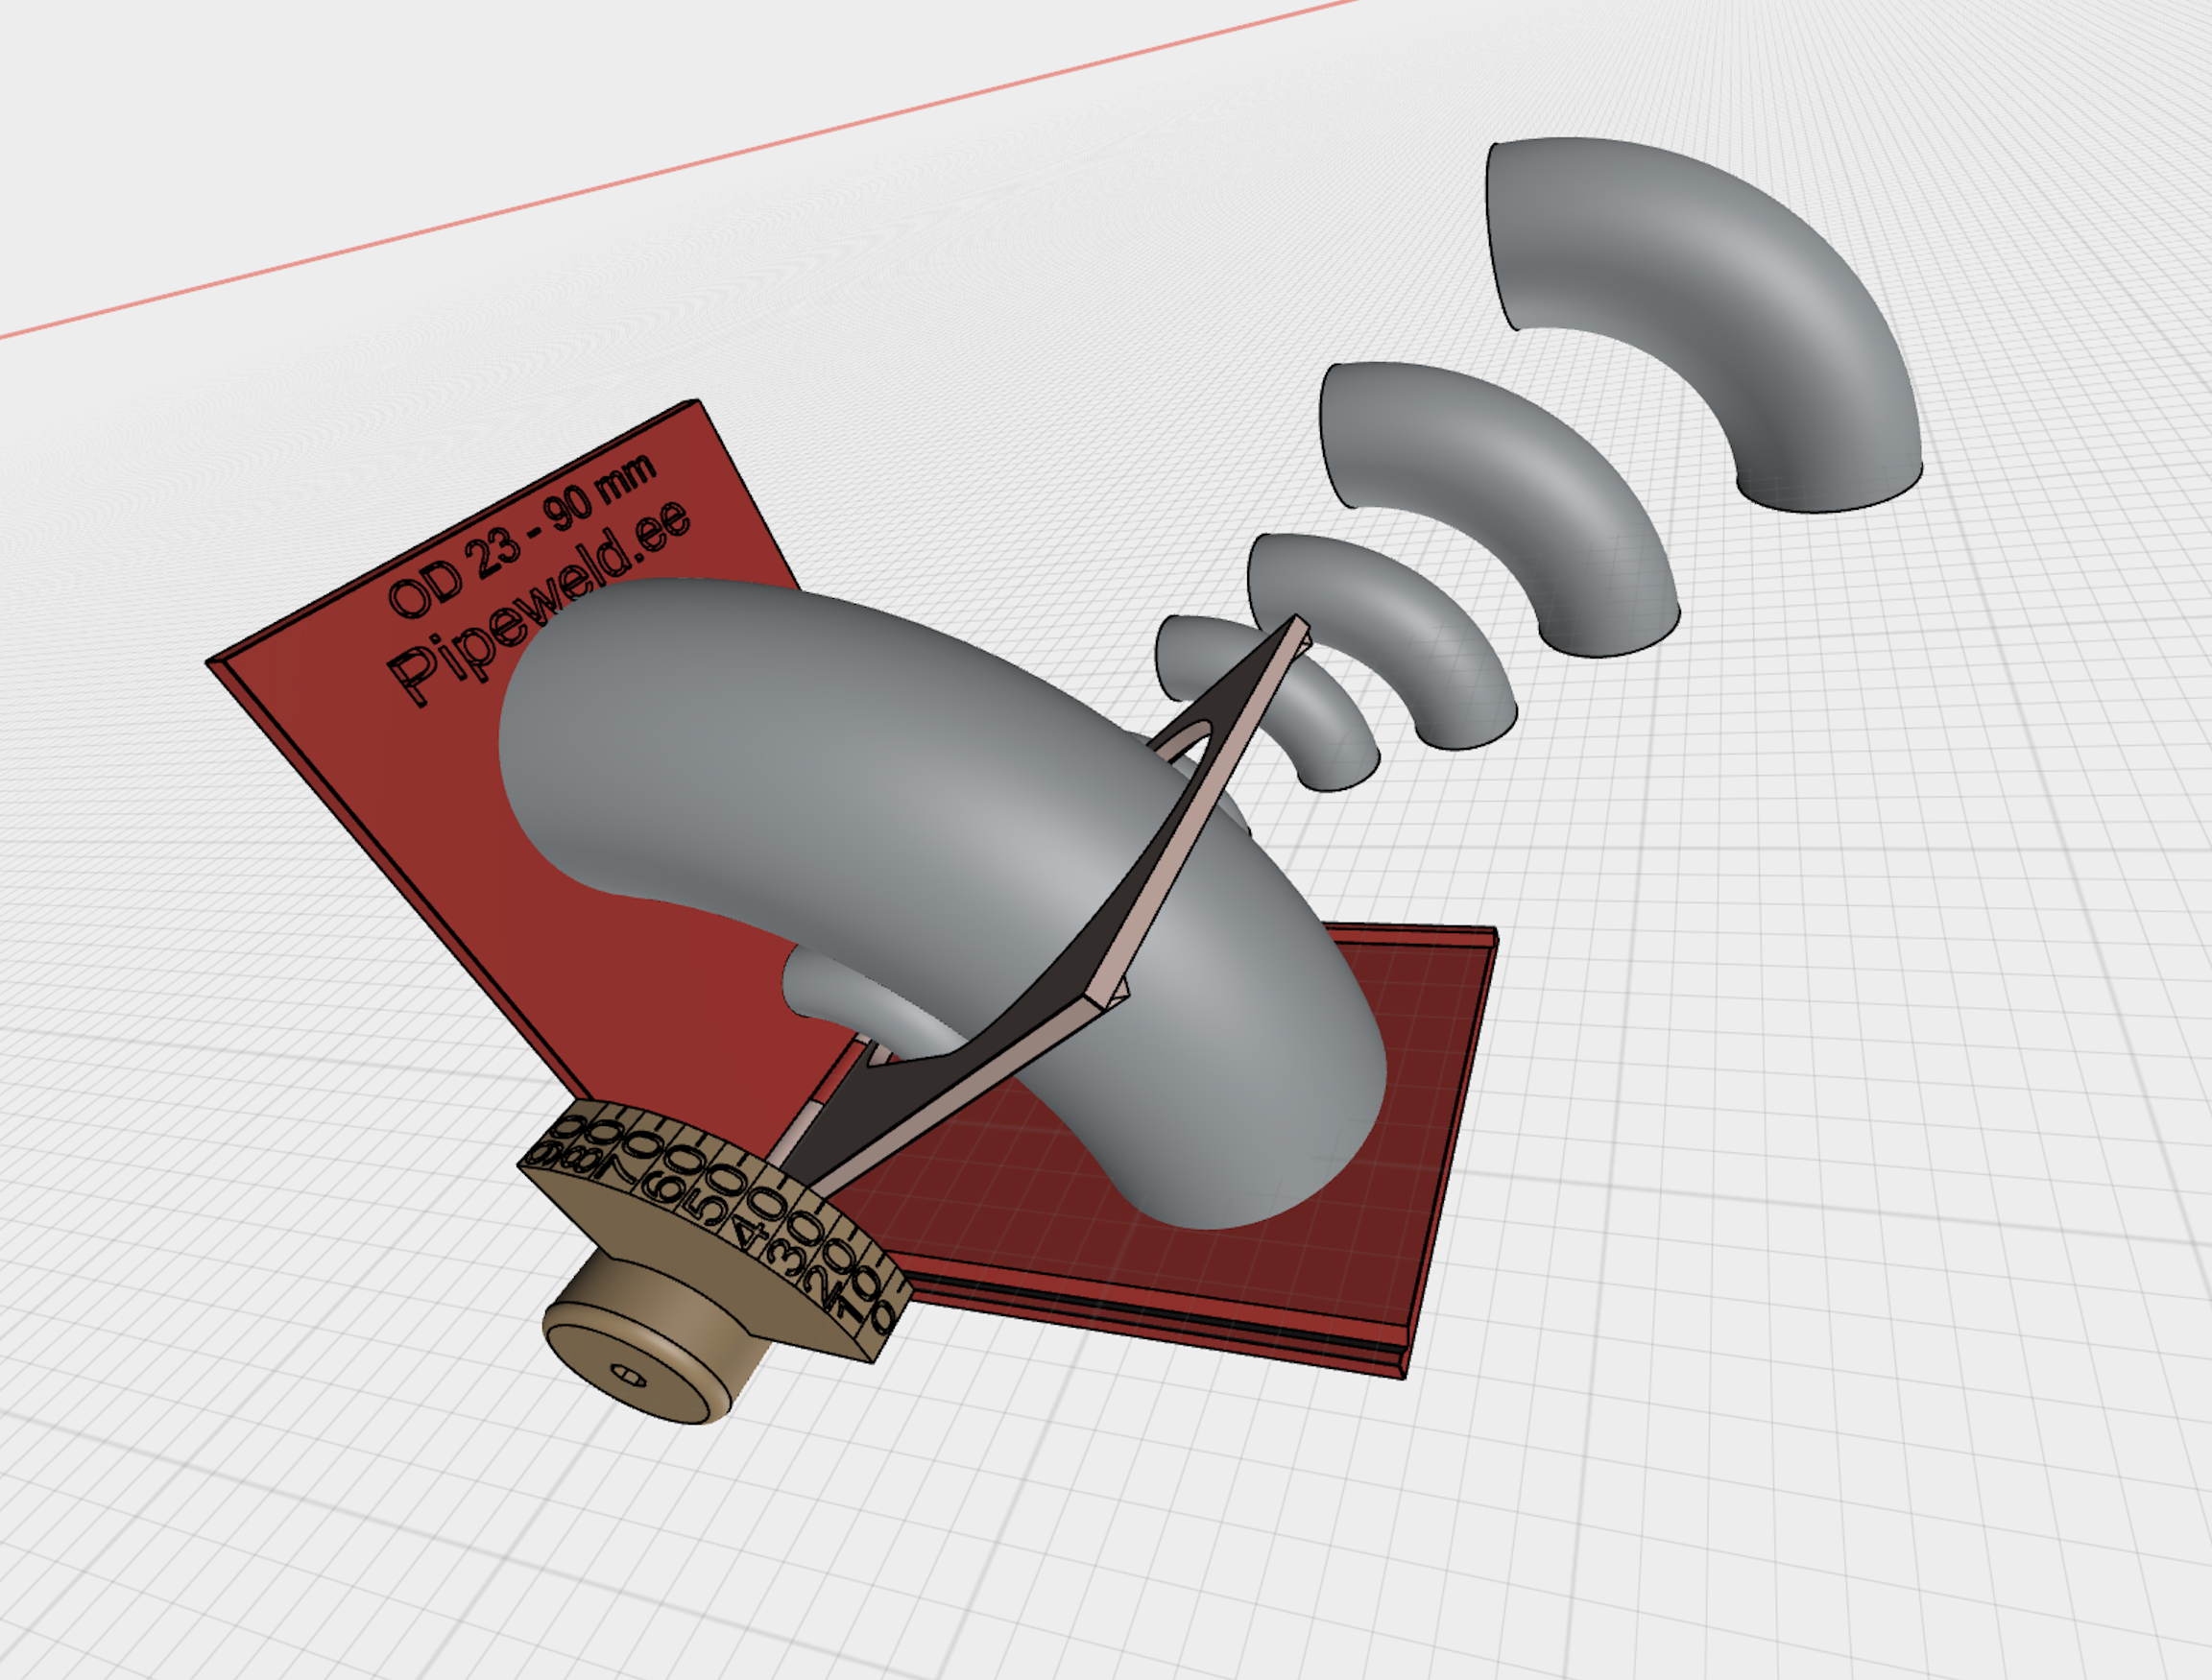
3D Mold for a TIG Purge Kit: STL and STEP Models
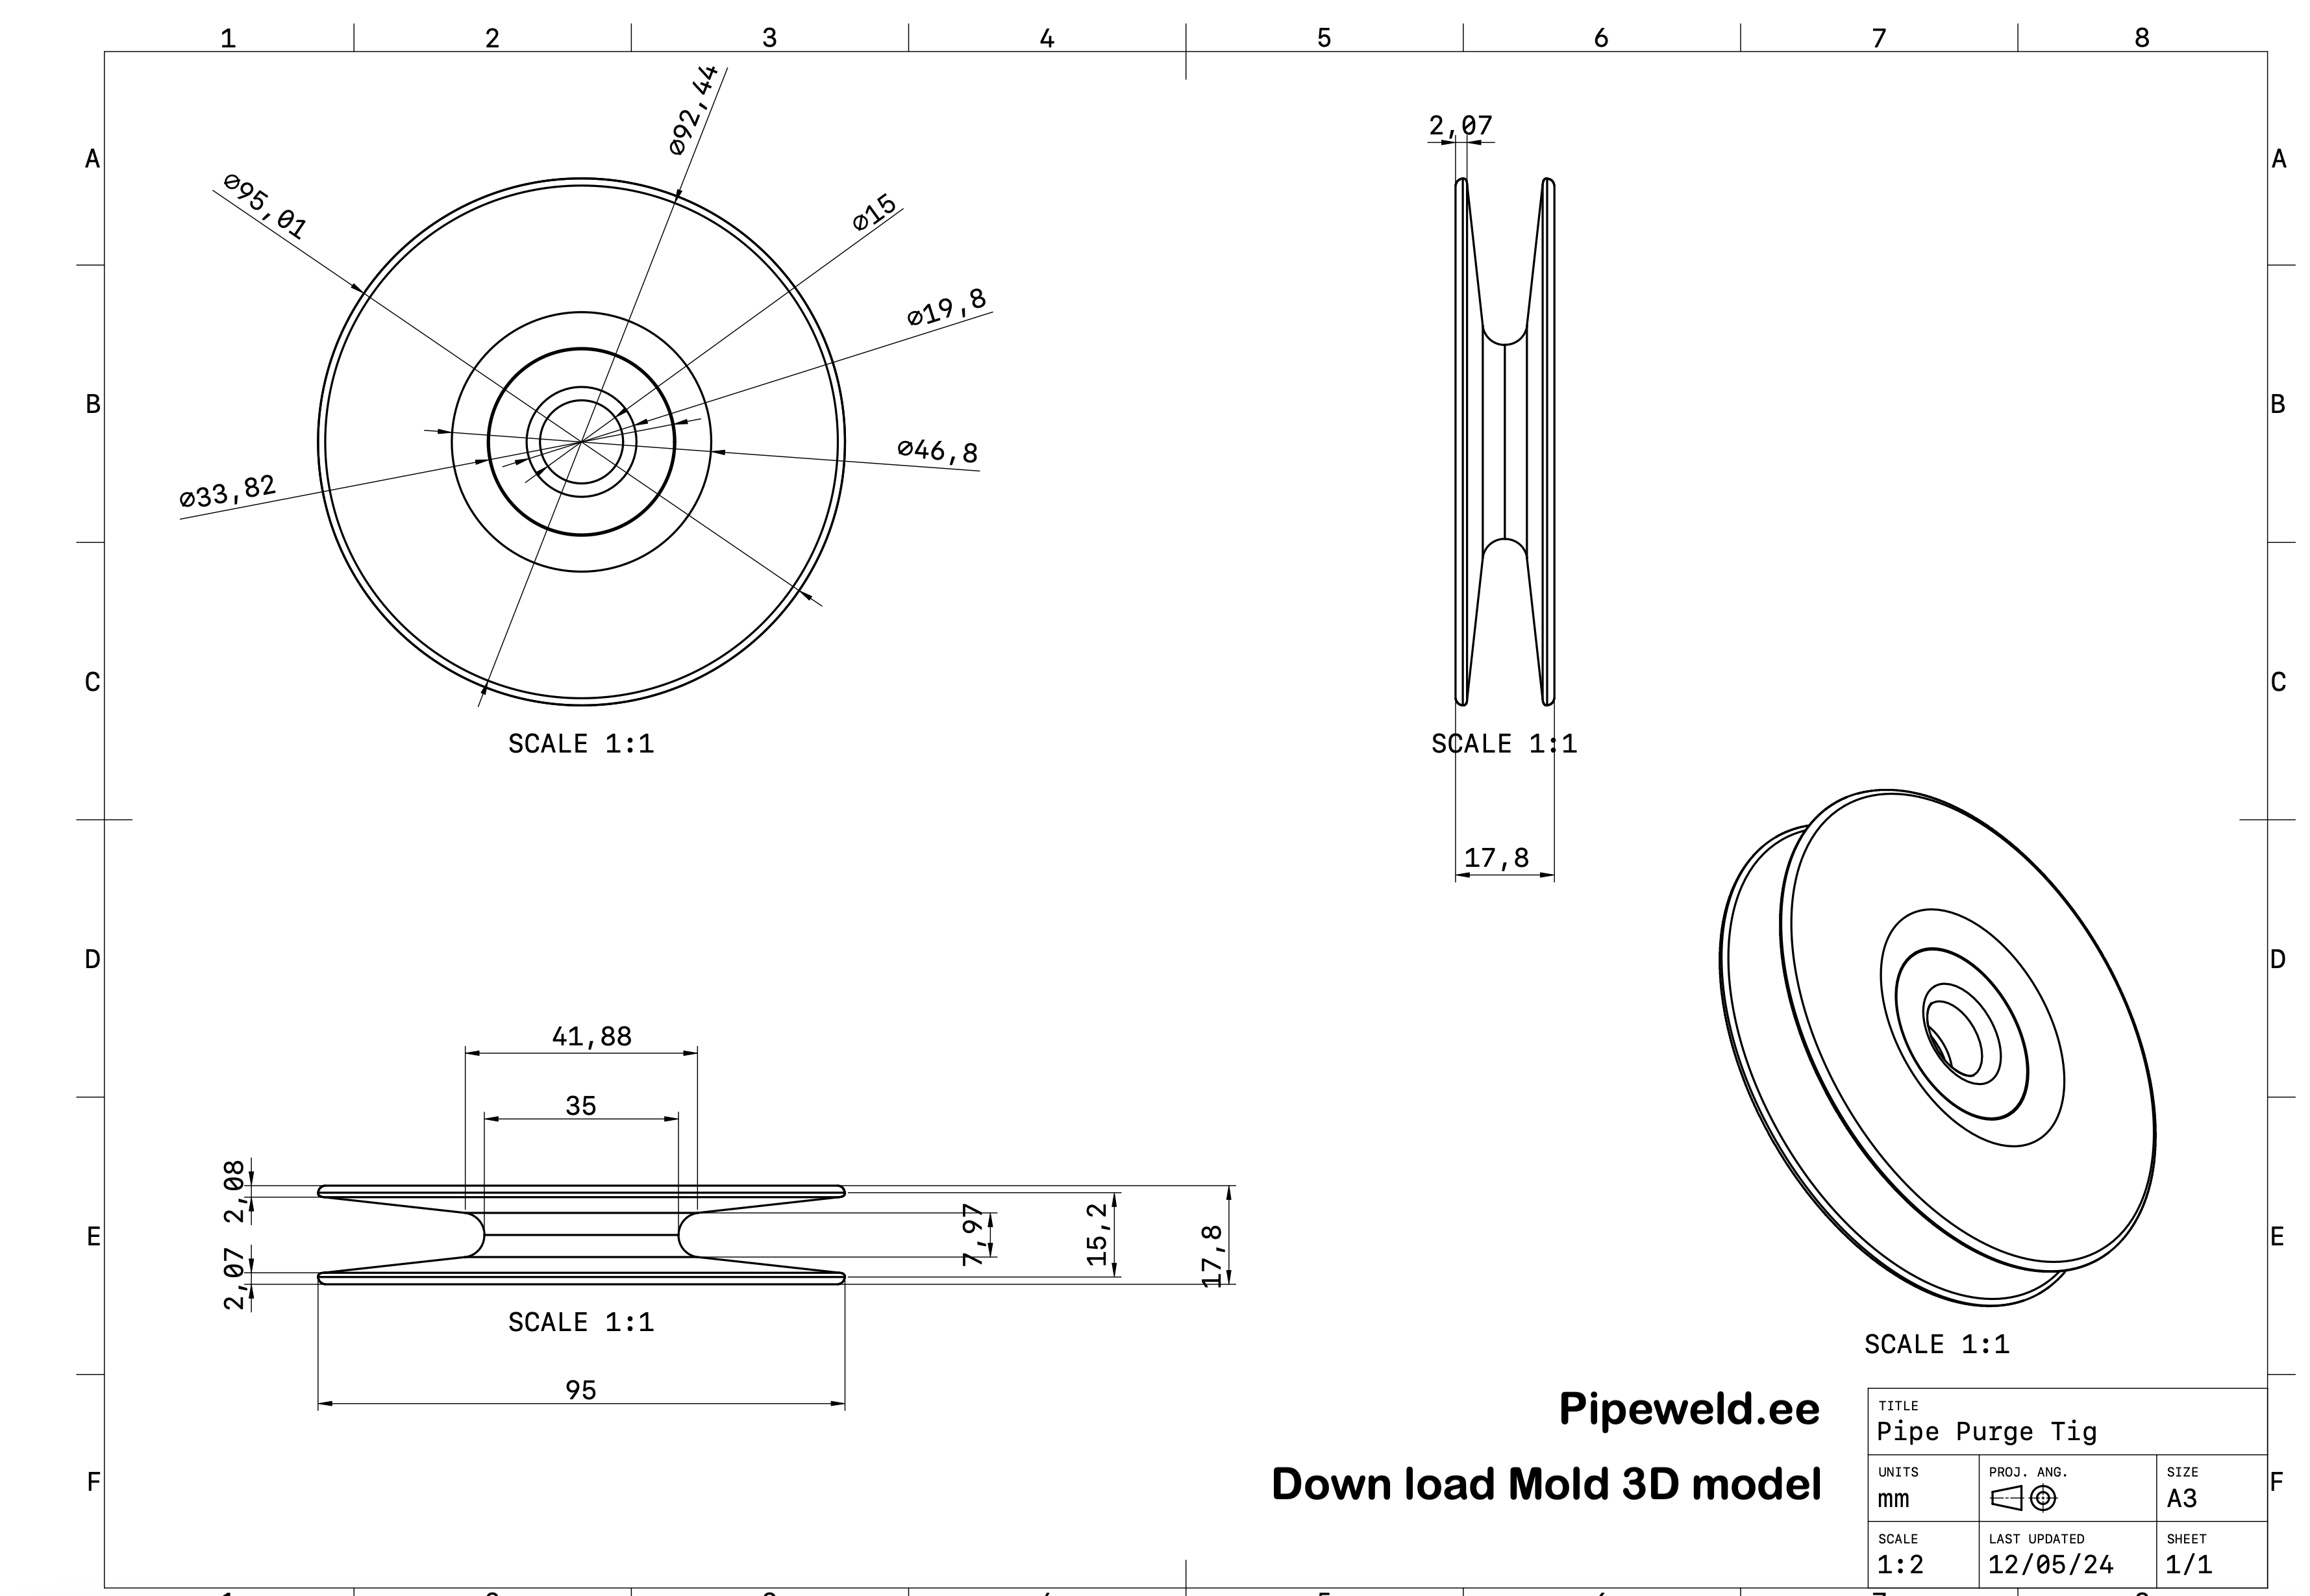
This tried-and-tested 3D model is provided in STEP format and consists of four parts. The base mold is designed for a purge tool with OD 94 mm, which works for DN80 pipes.
If you need a larger size, like DN150 (OD 169 mm), it’s easy to scale. Just adjust the model dimensions using software like Cura or any other slicer program before 3D printing. Most slicers allow object scaling along all three axes.
Download step format 3D mold model – here
Example of Scaling:
- If you need a 152 mm diameter tool from the 94 mm model, scale it by 61.7%.
- For a 212 mm diameter, scale it by 39.7%.
Adjust all three axes proportionally for accurate results.
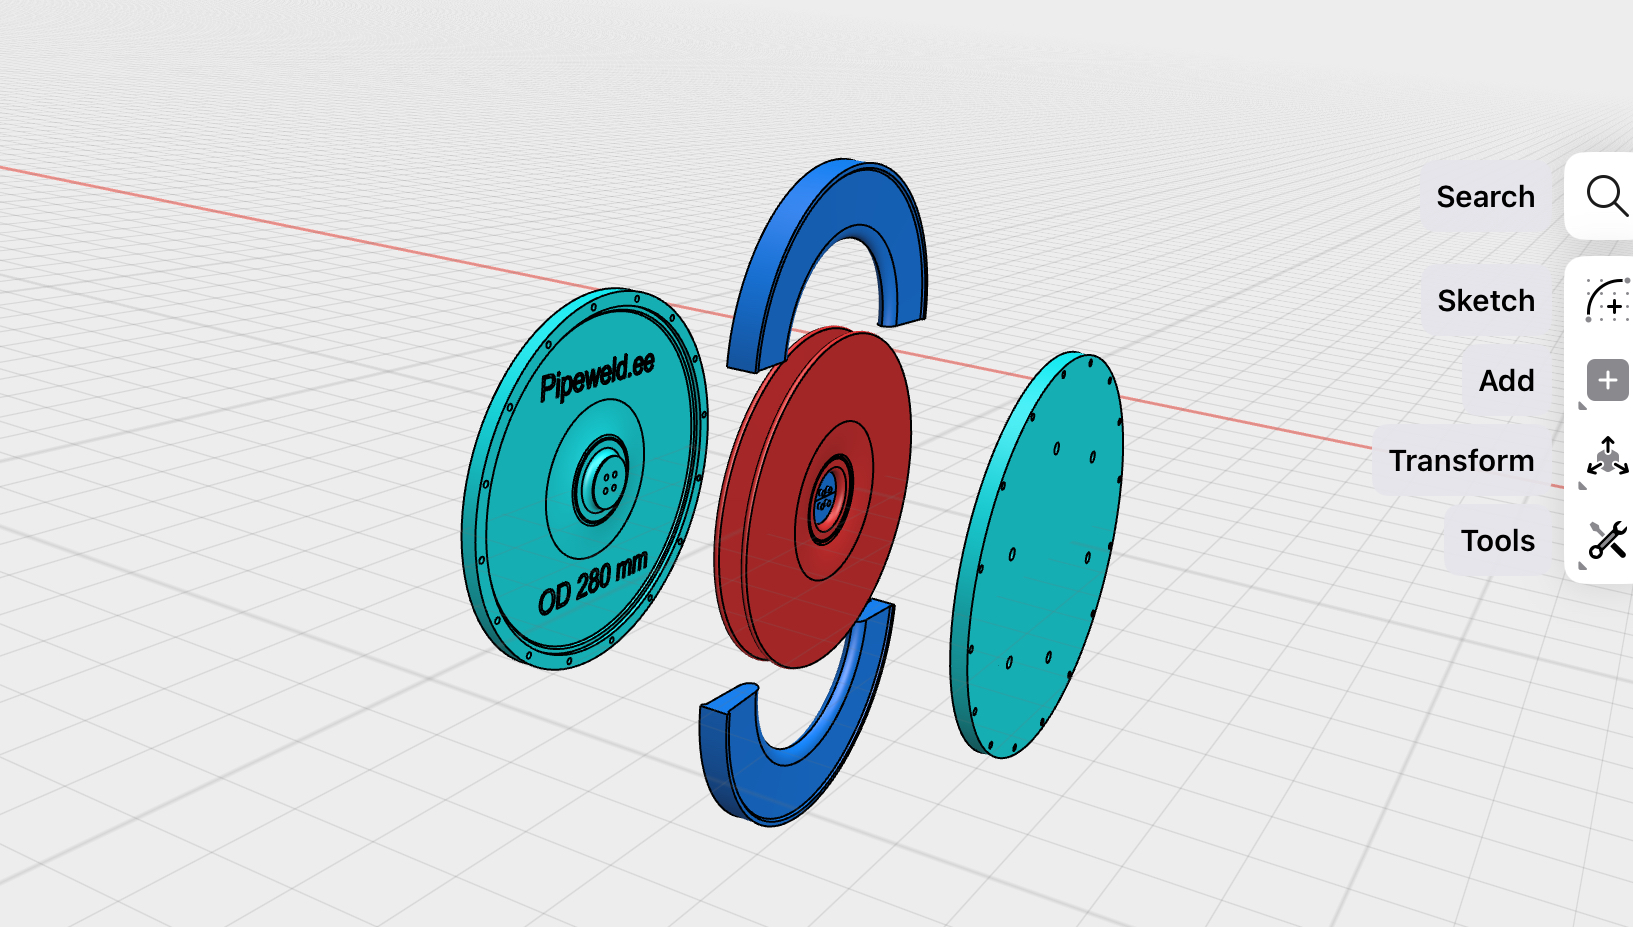
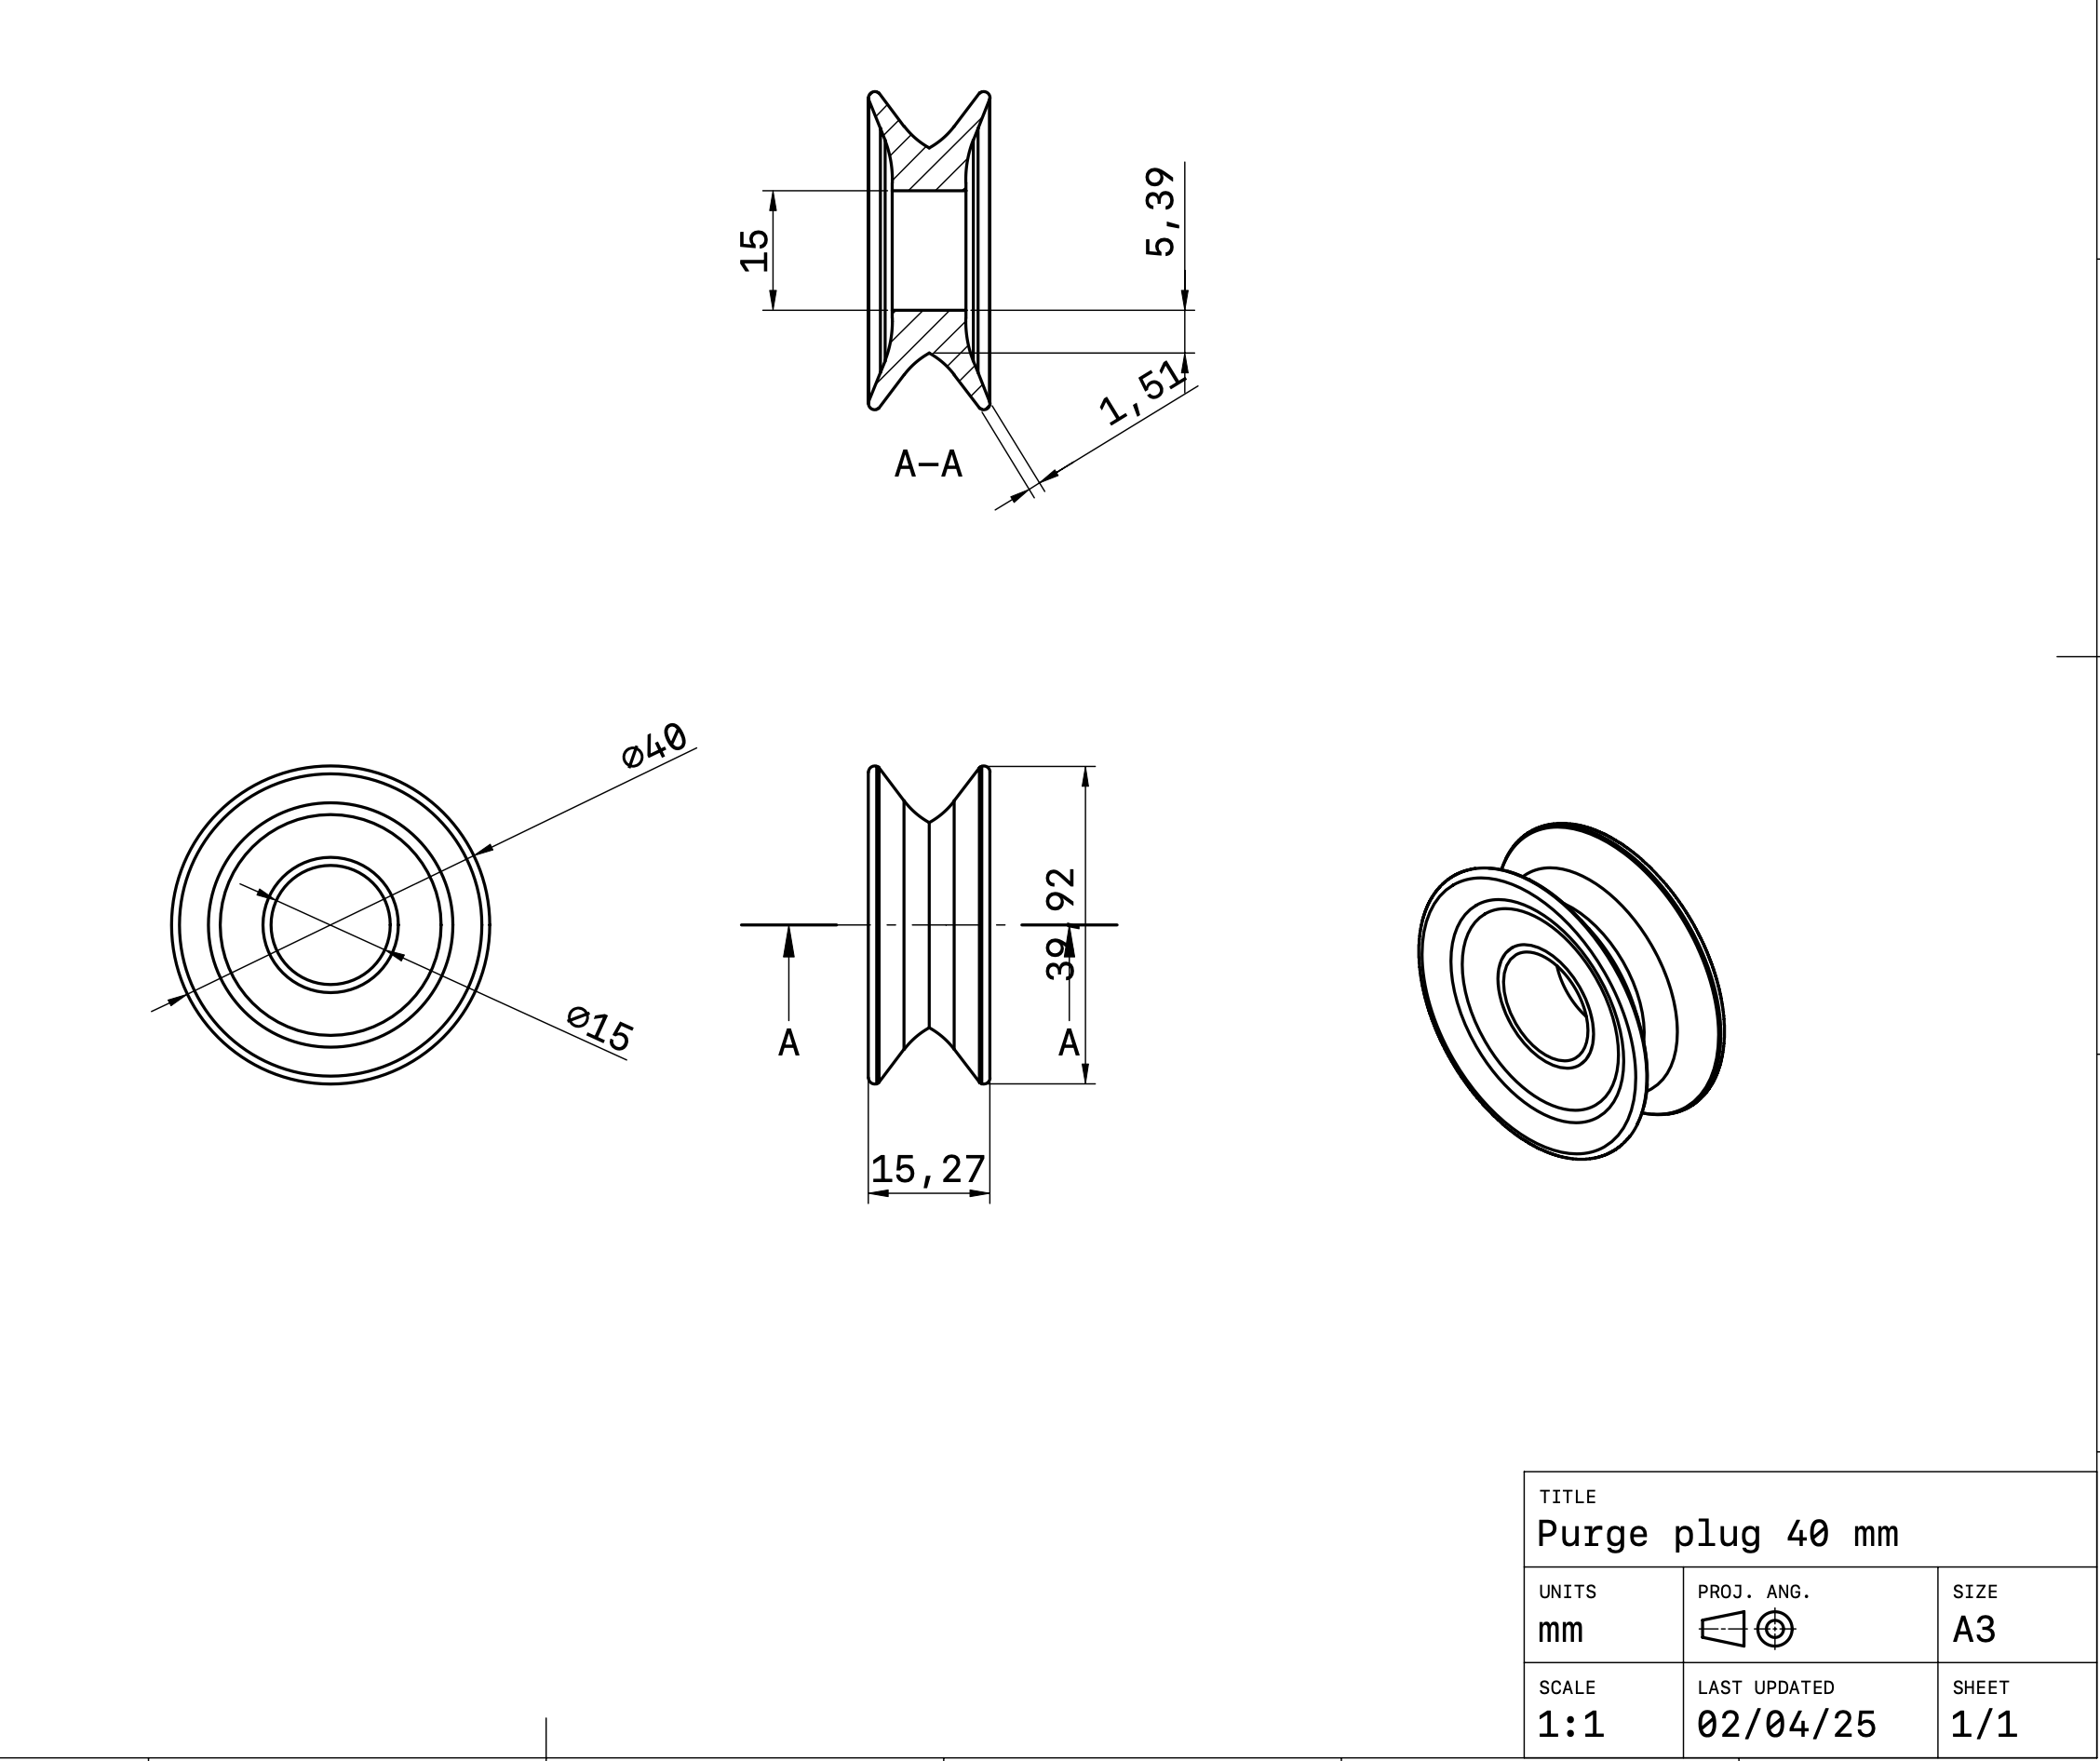
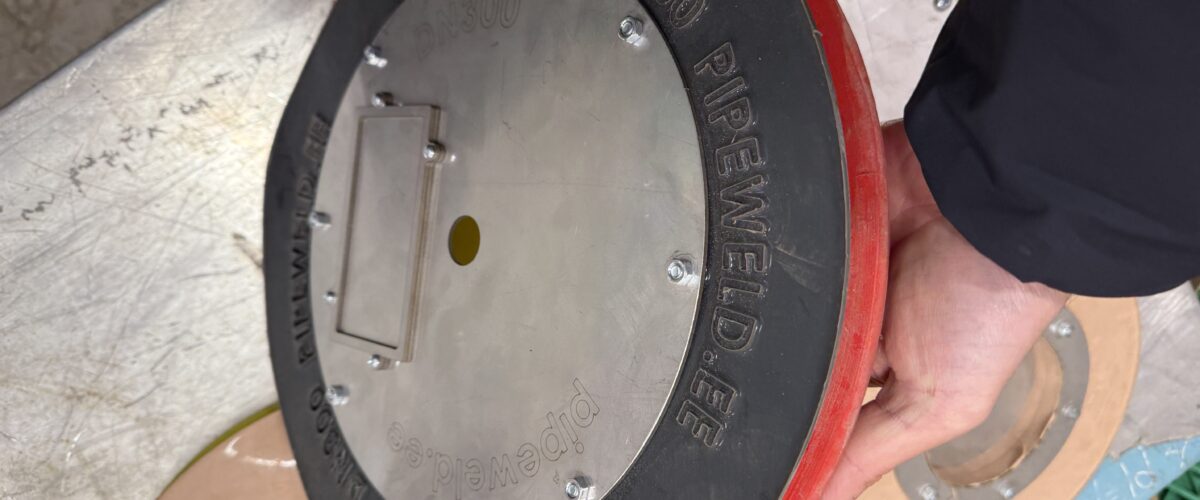
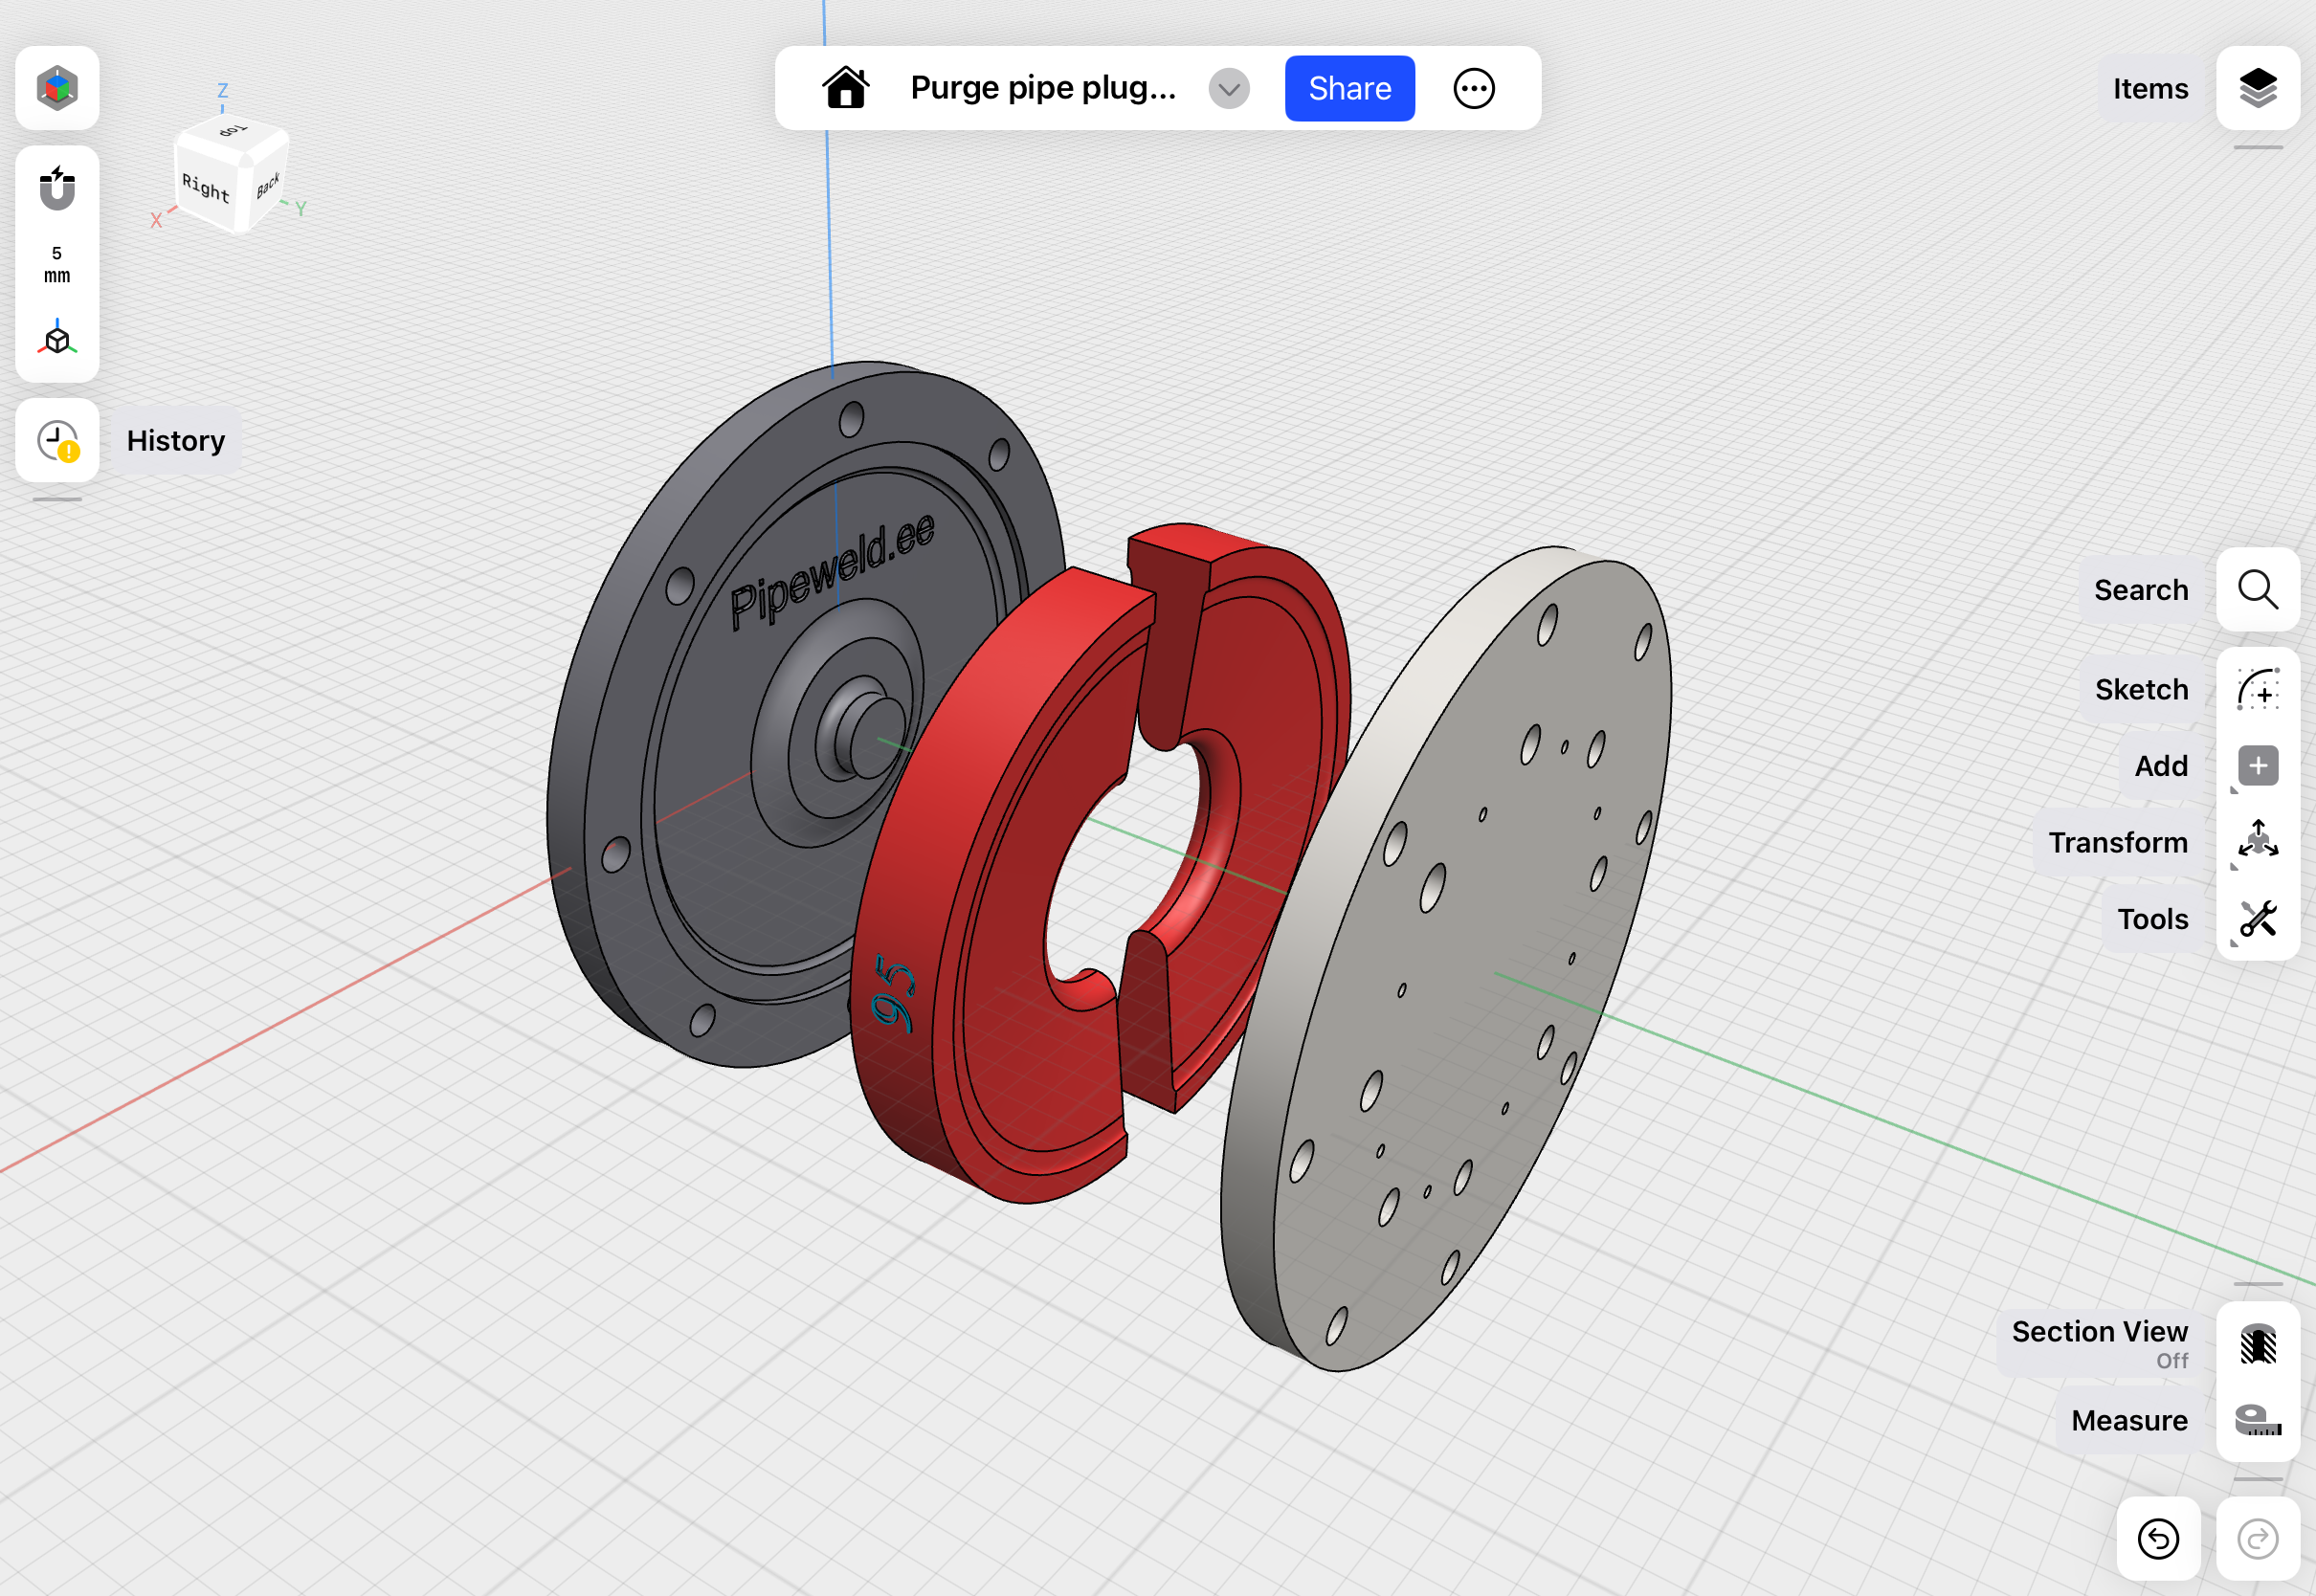
3D Model of a Purge Plug with an Inner Metal Plate 1 mm Thick
Update: January 14, 2025
Several people have asked me to create a model for a larger purge plug with a metal plate 1 mm thick. These types of plugs are often mass-produced, and you’ve probably seen them before.
I recommend using this plug for pipes with diameters from DN 200 to 400 mm.
I created the model with a diameter of 280 mm, using the original plug as a reference and basing all dimensions on it. Special attention was given to a specific groove that simplifies the installation of the metal plate in the center of the plug. This groove is located on only one side.
You can download the model – Purge Dn 250 – 200_STEP
PDF Drawing – purge plug silicon dn 250
Update: February 1, 2025
Since it turned out that the center mounting hole in the cap also scales proportionally when the models are resized (and we need it to remain at a fixed diameter), I’ve decided to provide finalized STL files. This way, you can proceed with printing them right away without any additional scaling.
The first batch of caps ranges from 65 mm to 107 mm in outer diameter.
- 65 — 15 mm stl file
- 70 — 15 mm stl file
- 75 — 15 mm stl file
- 80 — 15 mm stl file
- 85 — 15 mm stl file
- 90 — 15 mm stl file
- 95 — 15 mm stl file
- 100 — 15 mm stl file
- 107 — 15 mm stl file
Updates 04/02/25
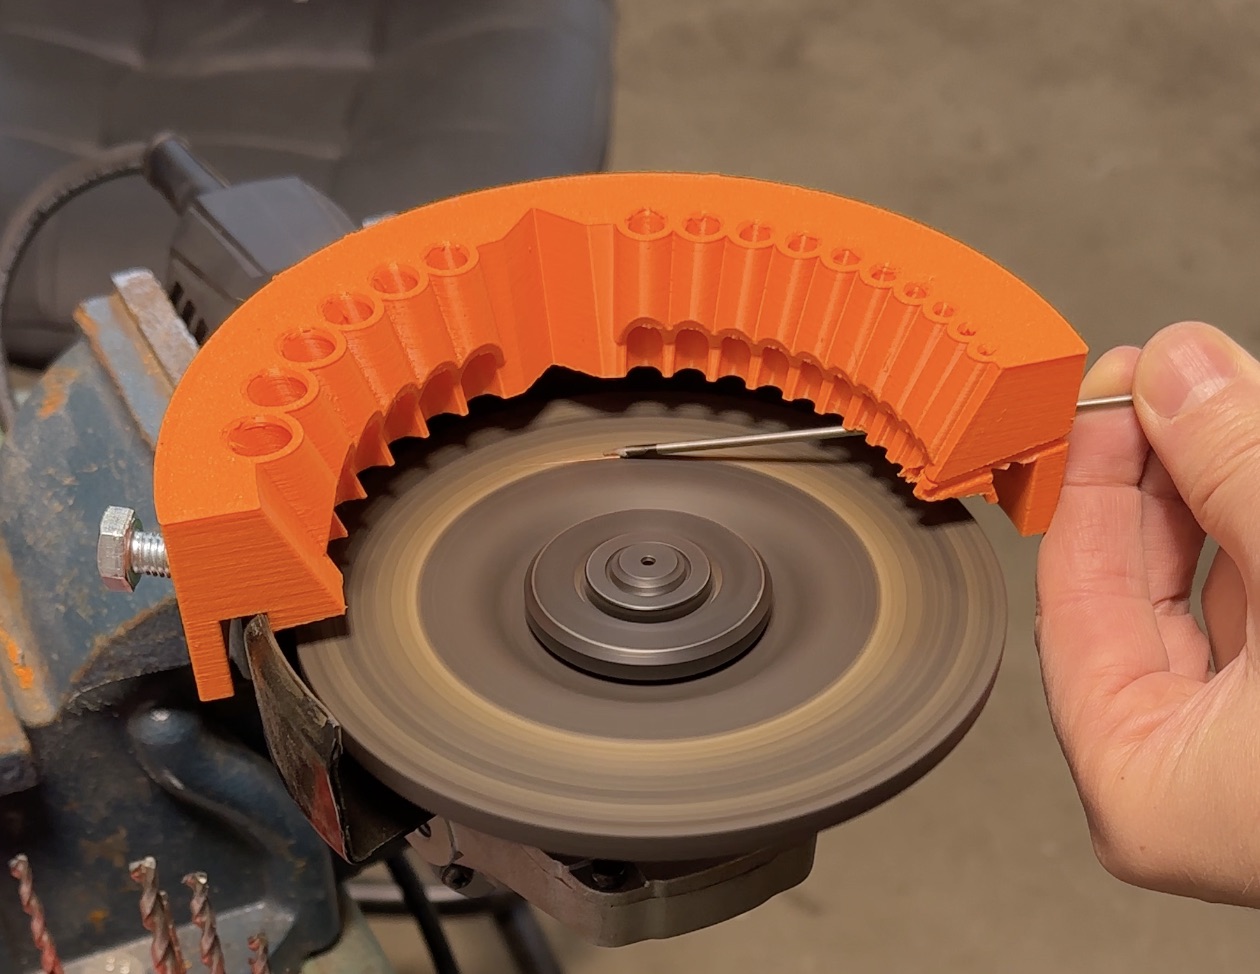
3D model of a mold for casting silicone plugs with a diameter of 35–55 mm and a 15 mm hole in the center.
Download the file, print it, and cast your plugs for €1.5 per piece
- 55 – 15 mm stl file
- 50 – 15 mm stl file
- 45 – 15 mm stl file
- 40 – 15 mm stl file
- 35 – 15 mm stl file
- 30 – 15 mm stl file
Choosing the Right Silicone for TIG Purge Kits
I highly recommend using platinum-cured silicone for its superior durability, sterility, and ease of use.
- Hardness Recommendation: After testing, I’ve found that a Shore hardness of 60 is ideal. Lower hardness (e.g., Shore 20) is too soft for industrial use.
- Mixing Precision: Use a digital scale accurate to 1-2 grams for perfect proportions when mixing the two components.
Pouring and Curing the Silicone
- Mixing & Preparation:
Mix the silicone thoroughly for at least 5 minutes. Assemble the 3D-printed mold using bolts to secure the parts. - Optional Vacuum Chamber:
For a bubble-free result, place the mixed silicone in a vacuum chamber to remove air pockets. If you don’t have access to a vacuum chamber, use silicone with a self-degassing feature. - Manual Pouring or Syringe Method:
Use a large medical syringe (100+ ml) to pour the silicone precisely. For DN80, you’ll need 40 grams of silicone.
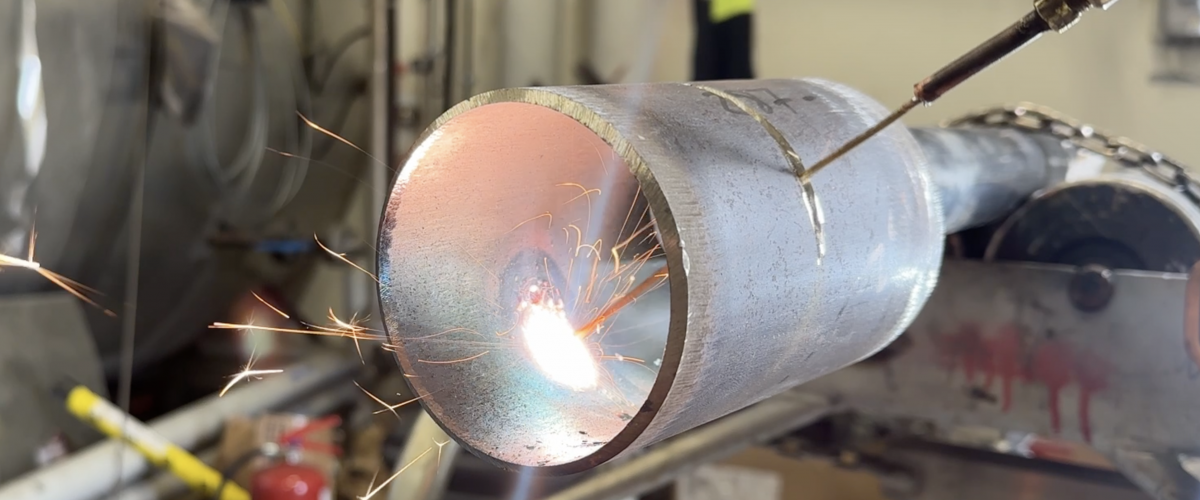
Removing Your DIY TIG Purge Tool
After 24 hours, carefully disassemble the mold and remove your new purge dam. However, don’t use it immediately—let it sit for a couple of days to ensure the surface is fully cured and no longer tacky.
What you need to buy for smooth work and great results:
- Find a place to print a 3D model and ask them to scale the model to the required diameters.
- Buy platinum silicone with a Shore hardness of 60.
- Get clamping bolts (8 pieces). The diameter will vary depending on the scaling. For DN 80, M5 bolts are suitable.
- Purchase a 100 ml syringe.
- Prepare a measuring container and a mixing container.
I made the holes for pouring silicone larger — 9 mm in diameter. This makes the pouring process easier and ensures high-quality curing.
Project Development. Updates as of March 10, 2025
Colleagues, it’s important to acknowledge that the devil is in the details. This project has completely captivated me, and together with my 13-year-old son, we began developing, testing, and refining it. It has turned out to be far more intriguing than I initially expected.
Project Update 11/03/25 new model.
Silicone Selection Issue
With your help, we discovered that finding silicone with a hardness of 60 is a formidable challenge. Consequently, we decided to abandon that idea and adapt the project to use more readily available types of silicone.
Solution: We developed four new plug models, which we cast independently. It turns out that the proposed design works perfectly for silicones with hardness levels of 20 and 40. We are now awaiting your feedback to adapt the models for various diameters.
Scaling of Parts
Unfortunately, scaling up the parts comes with its limitations.
Solution: Each design will have to be developed separately for each diameter. This does not deter us; the key is to determine which design best suits each diameter. Accordingly, we are proposing three design variants for your consideration:
- The 40 mm model will be adapted for diameters from 40 to 65 mm. The STL model can be downloaded below.
- The 75 model is intended for diameters from 65 to 115 mm. The STL model can be downloaded below.
- The 115 model is likely designed for diameters up to 156 mm, and the 115+ model is planned for diameters from 156 to 290 mm. The STL model can be downloaded below.
Silicone Efficiency
It is essential for you to know the volume of silicone required for manufacturing each plug. Moving forward, this information will be included in the file names.
Use of Restraining Bolts
Our practical experience has shown that restraining bolts are unnecessary for the molds—at least for models with diameters from 40 to 115 mm (we have not yet tested larger samples). The assembled mold is sufficiently stable, though it is recommended to have two small clamps on hand.
Silicone Injection into the Mold
The higher the hardness of the silicone, the lower its viscosity, which makes the injection process more challenging. It is necessary to refine the injection technique.
Solution: We purchased a vacuum chamber for 150 euros. After mixing the silicone in a cup, we place it in the chamber for 15 minutes under a negative pressure of –1 bar. Then, carefully to avoid incorporating air, we inject the silicone into the mold in two stages: first filling 75% of the volume, allowing the silicone to settle for 3 minutes, and then adding the remaining 25%.
If you do not have a vacuum chamber, you can build one yourself—details can be found here: YouTube Video. Alternatively, you can pour the silicone from the cup onto a plate, which significantly increases the surface area and reduces the layer’s thickness, allowing air bubbles to escape more easily.
File Format
We found that not everyone finds the current file format convenient to work with. We have taken this feedback into account and have already resolved the issue.
Conclusion
We have also posted short videos about the project’s development on social media and would greatly appreciate your attention and engagement with them. We look forward to your feedback and suggestions for further improving the project!
https://vm.tiktok.com/ZNdeV9UNq/
https://vm.tiktok.com/ZNdeVaukm/
https://vm.tiktok.com/ZNdeVDH9T/
New Silicone purge moldes that was tested can be download here.
Update 07 Dec 2025
New article about our new large-diameter purge systems – read here for the full description.
The project continues to develop. We are currently working with a 2-lip sealing system to reduce purge gas consumption. By decreasing the internal volume, the purging time is expected to be reduced by up to 40%.
Yes, we are aware that SC Profi is patented. However, in our case this is not an issue, as the patent is intended to prevent mass production, and we manufacture it only for our own internal use.
Ilja Arhi – Happy welding!
Thanks for shearing, i will try it.
Very helpful article, that save money and time.
NIce idea, waiting for bigger plugs!!!
Good evening,
I would like to ask for some information. I downloaded the 3D molds intended for 3D printing, but unfortunately I cannot open the files. Even the program you provided in the link downloads them, but it cannot open or run them.Therefore, I would like to kindly ask for advice on what steps I should take after downloading the files from your website so that I can prepare them and send them for 3D printing.
Thank you.
Hi, pls give me full name of the file you have downloaded?